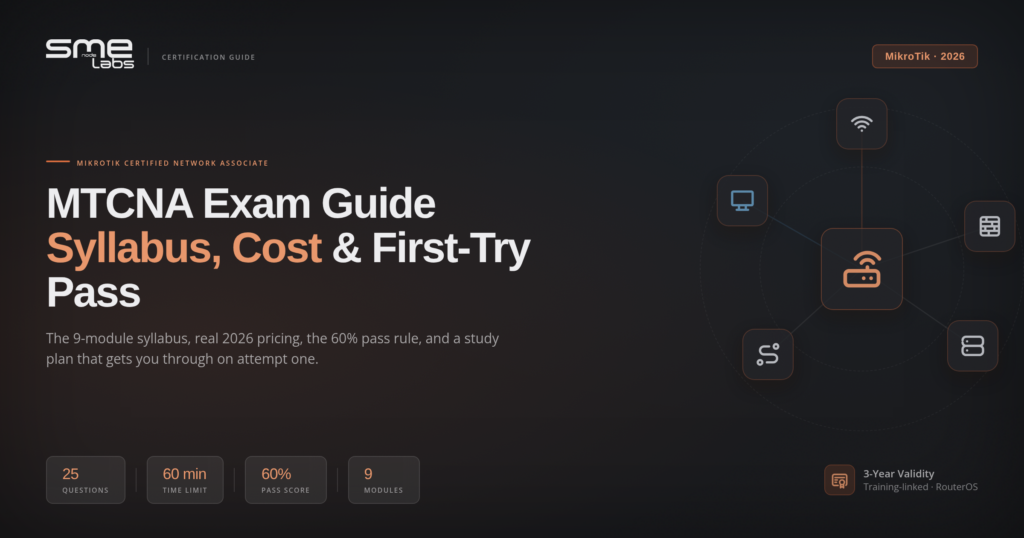
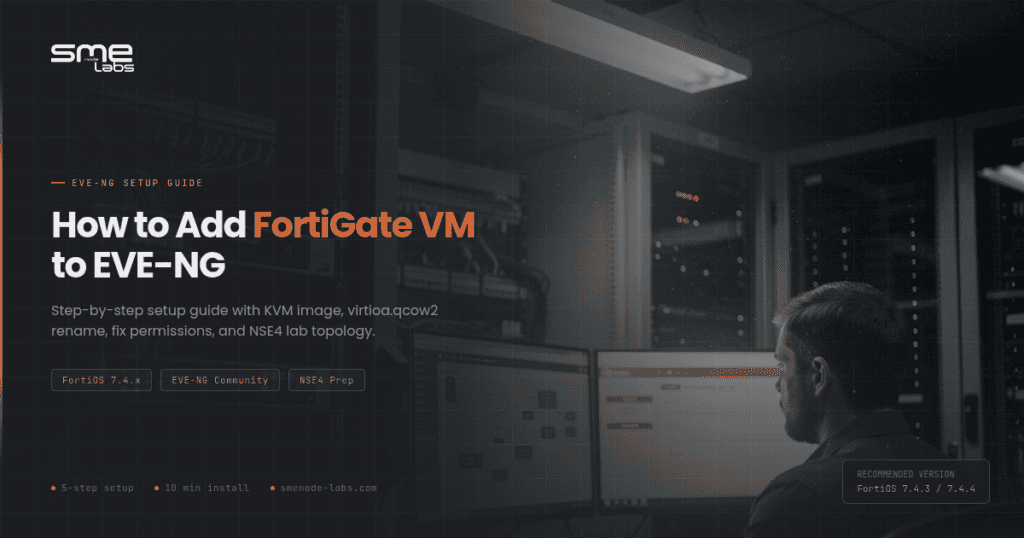
Adding FortiGate to EVE-NG takes about 10 minutes. Most candidates turn it into an hour-long problem by getting the folder name wrong or skipping the file rename step.
Here’s the short version: download the KVM image from Fortinet’s support portal, create a directory under /opt/unetlab/addons/qemu/ using the right naming format, upload the image, rename it to virtioa.qcow2, run the fix permissions command, and you’re done. You can be running a FortiGate firewall lab inside EVE-NG before your next coffee.
The rest of this guide walks through each step, covers which FortiOS version actually works in EVE-NG Community right now, and shows you a basic NSE4 lab topology to run your first firewall scenario.
What You Need Before You Start
Before anything else, make sure these are in place:
- EVE-NG installed and running. Either Community or Professional works. If you haven’t set it up yet, our EVE-NG on VMware Workstation setup guide covers the full installation.
- Virtualization enabled (VT-x/EPT). This is mandatory. FortiGate-VM won’t boot without Intel VT-x/EPT active in your hypervisor’s processor settings. This is different from most other EVE-NG nodes and catches a lot of people off guard.
- A Fortinet Support Portal account. You need one to download the KVM image. A free FortiCare account is enough for lab use.
- WinSCP or FileZilla (Windows) or SCP access (Linux/Mac). For transferring the image file to the server.
- SSH access to your EVE-NG server. For running a few commands after the upload.
That’s it. No EVE-NG Pro licence required. Community handles FortiGate just fine for NSE4 lab work.
Already past setup? Our FortiGate NSE4 Workbook includes pre-built EVE-NG topology files for all 70 labs, so you skip the topology-building step entirely and go straight to configuring.
Which FortiOS Version Should You Use?
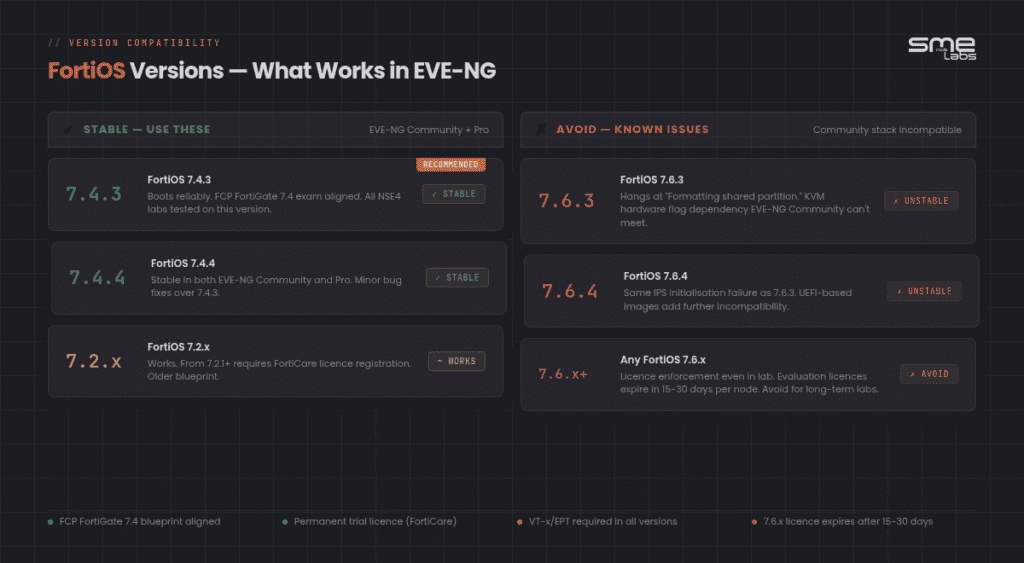
Not all FortiOS versions behave the same way inside EVE-NG, and picking the wrong one will waste your time.
Use FortiOS 7.4.x. Specifically 7.4.3 or 7.4.4. These boot reliably inside both EVE-NG Community and Pro with no extra configuration needed.
Avoid FortiOS 7.6.3 and 7.6.4 for now. Reports across the Fortinet community forums show instability, including hangs at “Formatting shared partition” and failures during IPS initialisation. The root cause is FortiOS 7.6’s increased dependency on KVM-level hardware flags that EVE-NG Community doesn’t expose. Until there’s an official fix, stick with 7.4.
FortiOS 7.2.x also works if you need to match a specific course or blueprint, but 7.4 maps directly to the current FCP FortiGate 7.4 exam, so that’s what NSE4 candidates should run.
One more thing worth knowing: from FortiOS 7.2.1 onward, FortiGate-VM uses a permanent trial licence tied to your FortiCare account. You get all standard features. The limitation is on concurrent sessions and registered IPs, which doesn’t matter for a personal NSE4 lab.

Step 1: Download the FortiGate KVM Image
Log in to the Fortinet Support Portal at support.fortinet.com. If you registered a free FortiCare account, that works here.
Navigate to:
Support > Firmware Download > FortiGate > Select version (7.4.x) > KVM
Look for a file named something like:
FGT_VM64_KVM-v7-build2573-FORTINET.out.kvm.zipThe build number changes with each version. Download the .zip file. Don’t extract it locally. You’ll unzip it directly on the EVE-NG server in Step 4.
Step 2: Create the Image Directory
SSH into your EVE-NG server. Create the image directory using the correct naming format. EVE-NG reads this folder name to identify the device type and display it in the GUI.
For FortiOS 7.4.3:
mkdir /opt/unetlab/addons/qemu/fortinet-FGT-v7.4.3/The pattern is fortinet-FGT-v{version}. Get this wrong and FortiGate won’t appear in the node list when you try to add it to a lab. If you want multiple FortiOS versions available, create a separate folder for each one.
Step 3: Upload the Image File
Use WinSCP, FileZilla, or SCP to copy the .zip file to the directory you just created.
WinSCP users: set the transfer mode to Binary, not Automatic or Text. Uploading in Text mode corrupts the file and the VM will fail to boot with no obvious error message.
Target path on the EVE-NG server:
/opt/unetlab/addons/qemu/fortinet-FGT-v7.4.3/FortiGate KVM images are around 500-600 MB, so the upload takes a few minutes depending on your connection.
Step 4: Extract and Rename the Image
This is the step where most people go wrong.
SSH back into your EVE-NG server and move into the folder:
cd /opt/unetlab/addons/qemu/fortinet-FGT-v7.4.3/Extract the zip:
unzip FGT_VM64_KVM-v7-build2573-FORTINET.out.kvm.zipAfter extraction, you’ll see a file called fortios.qcow2. Rename it to virtioa.qcow2.
mv fortios.qcow2 virtioa.qcow2This rename is not optional. EVE-NG looks for virtioa.qcow2 by name. If the file is called anything else, the node starts but produces no console output and you’re left staring at a blank screen.
I’ve seen candidates spend 40 minutes troubleshooting “no console” issues that came down to this one rename. It’s that specific.
Clean up the zip file:
rm FGT_VM64_KVM-v7-build2573-FORTINET.out.kvm.zipStep 5: Fix Permissions
Run the EVE-NG permissions command:
/opt/unetlab/wrappers/unl_wrapper -a fixpermissionsThis sets ownership and permissions across all image directories. You need to run it any time you add a new image to EVE-NG, not just FortiGate. Skip it and the node either fails to start or starts and immediately stops.
That’s the image setup done. Five steps total.
Step 6: Add FortiGate to a Lab
Open the EVE-NG web interface. Create a new lab or open an existing one.
Right-click the canvas and choose Add a new node. Scroll through the device list and you should see FortiGate listed. If you added multiple FortiOS versions, they appear as separate entries.
Set the node resources:
- vCPU: 1
- RAM: 1024 MB
You can push RAM to 2048 MB if your lab machine has spare capacity, but the trial licence doesn’t unlock extra features above 2 GB anyway. For a standard NSE4 lab with 3 or 4 devices running, 1024 MB per FortiGate is fine.
Drop the node into the canvas and start connecting interfaces. EVE-NG gives you 4 virtio interfaces by default, which appear in FortiOS as port1 through port4.
Basic NSE4 Lab Topology
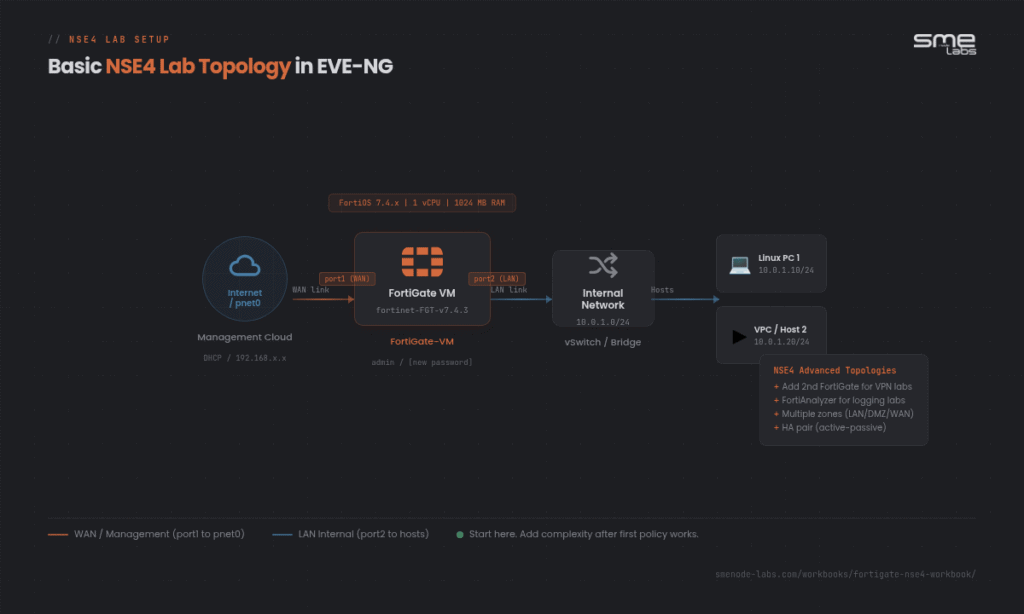
Here’s a simple two-interface topology that covers most NSE4 exam scenarios without overcomplicating your lab:
[Management Cloud / pnet0]
          |
        port1  (WAN / Management)
     [FortiGate-VM]
        port2  (Internal LAN)
          |
     [Linux Host or VPC]
port1 connects to the management cloud (pnet0). This gives the FortiGate reachability for licence registration, FortiGuard updates, and lets you access the GUI directly from your Windows or Mac machine.
port2 connects to an internal network with one or more test hosts. A basic Linux VM or EVE-NG’s built-in VPC (Virtual PC) is enough to test firewall policies, NAT, and VPN connectivity.
For more advanced NSE4 topics like IPsec site-to-site VPN or SD-WAN, you’ll add a second FortiGate and extend the topology. But start here. Get this working before adding more nodes.
A lot of NSE4 candidates try to build a “complete” lab before they’ve run a single policy. That’s backwards. Start with one FortiGate, one client, and one working firewall rule. Build from there as you progress through the topics.
First Boot and Initial Configuration
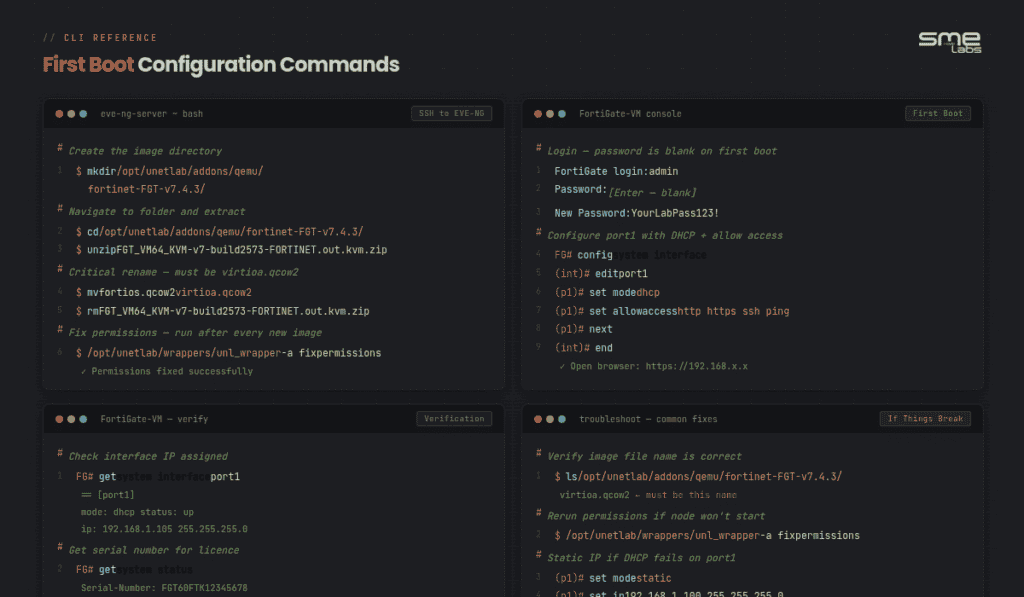
Start the FortiGate node in EVE-NG. The first boot takes 1 to 2 minutes.
Click the node to open the console. When the login prompt appears:
- Username:
admin - Password: press Enter (blank on first boot)
FortiOS will ask you to set a new password straight away. Pick something you’ll remember across multiple lab sessions.
Then configure port1 to match your EVE-NG management network. For DHCP:
config system interface
    edit port1
        set mode dhcp
        set allowaccess http https ssh ping
    next
end
If DHCP doesn’t assign an address, go manual:
config system interface
    edit port1
        set mode static
        set ip 192.168.1.100/24
        set allowaccess http https ssh ping
    next
end
Once port1 has an IP, open a browser and go to https://192.168.1.100. Accept the self-signed certificate warning. You’re in the GUI and ready to start your first lab.
Troubleshooting Common Issues
FortiGate doesn’t show up in the EVE-NG device list.
Check the folder name. It must follow fortinet-FGT-v{version} format. Also confirm you ran the fix permissions command after creating the folder.
Node starts but console shows nothing.
Two causes, in order of likelihood: the file isn’t named virtioa.qcow2, or VT-x/EPT isn’t enabled in your hypervisor. Check both before anything else.
Hangs at “Formatting shared partition.”
You’re running FortiOS 7.6.x. Switch to 7.4.3. See the version selection section above.
GUI unreachable after port1 config.
The allowaccess setting on port1 needs http https included. Run show system interface port1 in the CLI and confirm it’s set correctly.
Licence errors or registration failures.
From FortiOS 7.2.1 onward, register the VM at support.fortinet.com. Find the serial number in the CLI by running get system status. Add it to your FortiCare account and the trial licence activates automatically.
Why a FortiGate EVE-NG Lab Matters for NSE4
The FCP FortiGate exam doesn’t test your ability to recall definitions. It tests whether you can read a config, spot a misconfiguration, or trace why a VPN isn’t coming up. That kind of recognition only comes from hours of hands-on time.
The exam is 60 questions in 60 minutes, about a minute per question. Candidates who’ve run through firewall policies, NAT rules, and VPN setups in a real lab answer those questions fast. Candidates who’ve only watched videos spend 2 to 3 minutes per question and don’t finish. That gap isn’t about knowledge; it’s about pattern recognition built through lab reps.
Think of it like learning to drive. You can study the highway code for weeks, but actual road time is what makes you react quickly when something happens.
Get the lab running early in your study plan. Run through the same scenarios multiple times. That repetition is what builds the speed the exam demands.
Want to skip the topology-building and go straight to practising? Our FortiGate NSE4 Workbook has every EVE-NG topology pre-built and all 70 labs structured by exam domain. You open the lab and start configuring immediately. Each lab includes verified CLI and GUI outputs, so you know exactly what correct looks like. See what’s inside here.
Bottom Line
Adding FortiGate to EVE-NG comes down to five things: the KVM image format, the right folder name (fortinet-FGT-v{version}), the right file name (virtioa.qcow2), the fix permissions command, and VT-x enabled. Get those right and the node works every time.
Use FortiOS 7.4.3 for NSE4 prep. Start with a simple two-interface topology. Get one working firewall policy before expanding the lab.
Want a structured path through all 70 NSE4 lab topics? The FortiGate NSE4 Workbook has every topology file included and maps each lab to the current FCP FortiGate 7.4 blueprint. You stop building environments and start learning the content that actually shows up on exam day.