Your EVE-NG VM boots fine. You log in, open the web UI, drag a router onto the canvas, hit start, and the node goes red. No console. No error you can Google without wading through six forum threads from 2019.
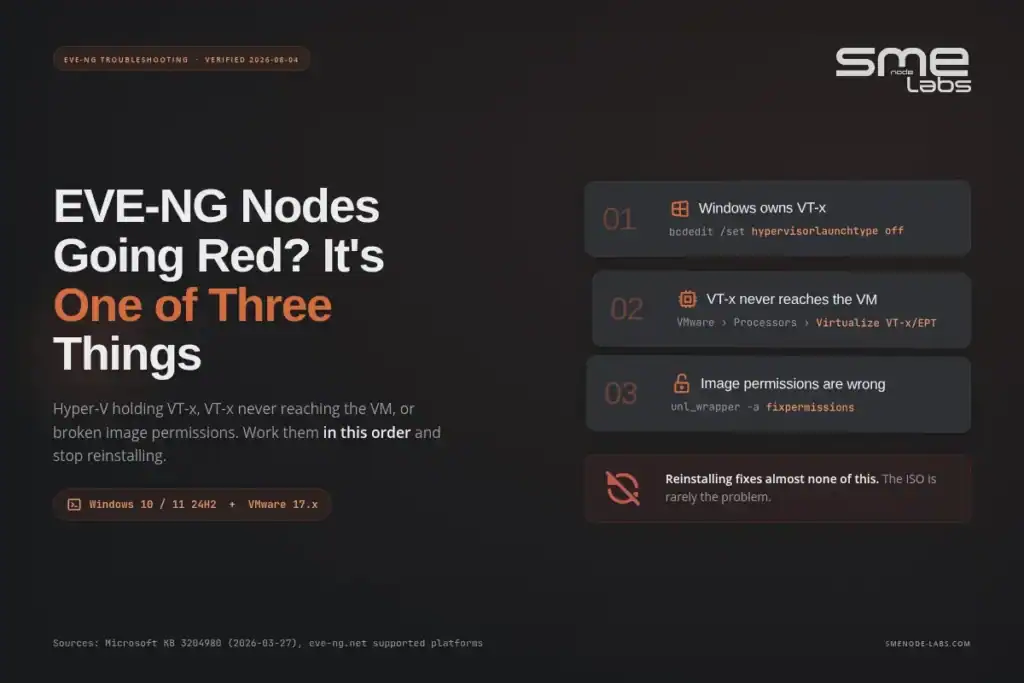
Almost every EVE-NG install failure traces back to one of three things, and the first one is why you need to disable Hyper-V before anything else:
- Windows is already holding the CPU virtualization extensions (Hyper-V, or one of the features that quietly turns it on), so VMware can’t hand them to EVE-NG
- VT-x isn’t enabled or isn’t passed through to the EVE-NG VM
- File permissions on your uploaded images are wrong, so templates appear but nodes refuse to start
That’s the short version. Fix those three, in that order, and the red nodes go green.
You’ll get the exact commands for each below, including the Windows 11 24H2 problem that breaks the old “just uncheck Hyper-V” advice. We’ve run this sequence on a lot of student laptops. Let’s start with the one that causes the most pain.
The 3-minute triage table
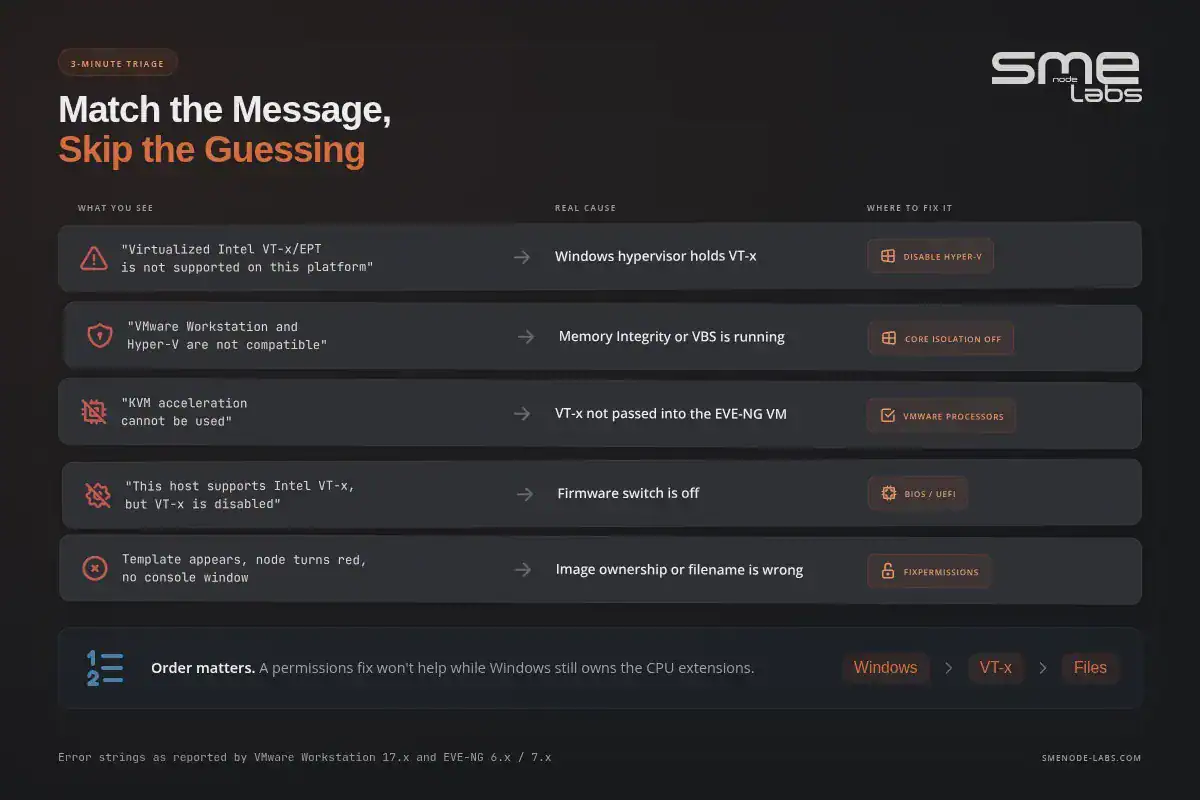
Match your error message to the fix. Then jump to that section.
| What you see | Real cause | Section |
|---|---|---|
| “Virtualized Intel VT-x/EPT is not supported on this platform” | Windows hypervisor owns VT-x | Disable Hyper-V |
| “VMware Workstation and Hyper-V are not compatible” | Hyper-V or a dependent feature is running | Disable Hyper-V |
| “KVM acceleration cannot be used” inside EVE-NG | VT-x not passed into the VM | Virtualization errors |
| “This host supports Intel VT-x, but VT-x is disabled” | BIOS/UEFI setting is off | Virtualization errors |
| Node turns red instantly, no console window | Image permissions or wrong folder name | Permissions errors |
| Template shows up, node won’t boot | Missing fixpermissions run | Permissions errors |
| Whole VM won’t power on, “unsupported” warning | VMware version too old | Virtualization errors |
Here’s the version of this that eats a weekend. New ThinkPad, Windows 11 Pro 24H2, VMware Workstation 17. You uncheck Hyper-V in Windows Features, reboot, and still get the VT-x error. What’s easy to forget: Docker Desktop turns on Virtual Machine Platform, and 24H2 can switch Memory Integrity back on after an update. Two hidden switches, same result. Twenty minutes of the checklist below clears both.
Building labs and want the topologies ready-made? Our CCNA Lab Workbook ships with the EVE-NG lab file, so you’re configuring devices instead of drawing boxes.
How to disable Hyper-V on Windows 10 and 11
Here’s the deal. Only one piece of software can own the CPU’s virtualization extensions at a time. Microsoft says this outright: third-party virtualization apps like VMware and VirtualBox can’t run alongside Hyper-V, Memory Integrity, or Credential Guard (KB 3204980, updated 2026-03-27). It’s by design, not a bug.
So to disable Hyper-V properly, you turn off three separate layers. Miss one and you’re back to the same error.
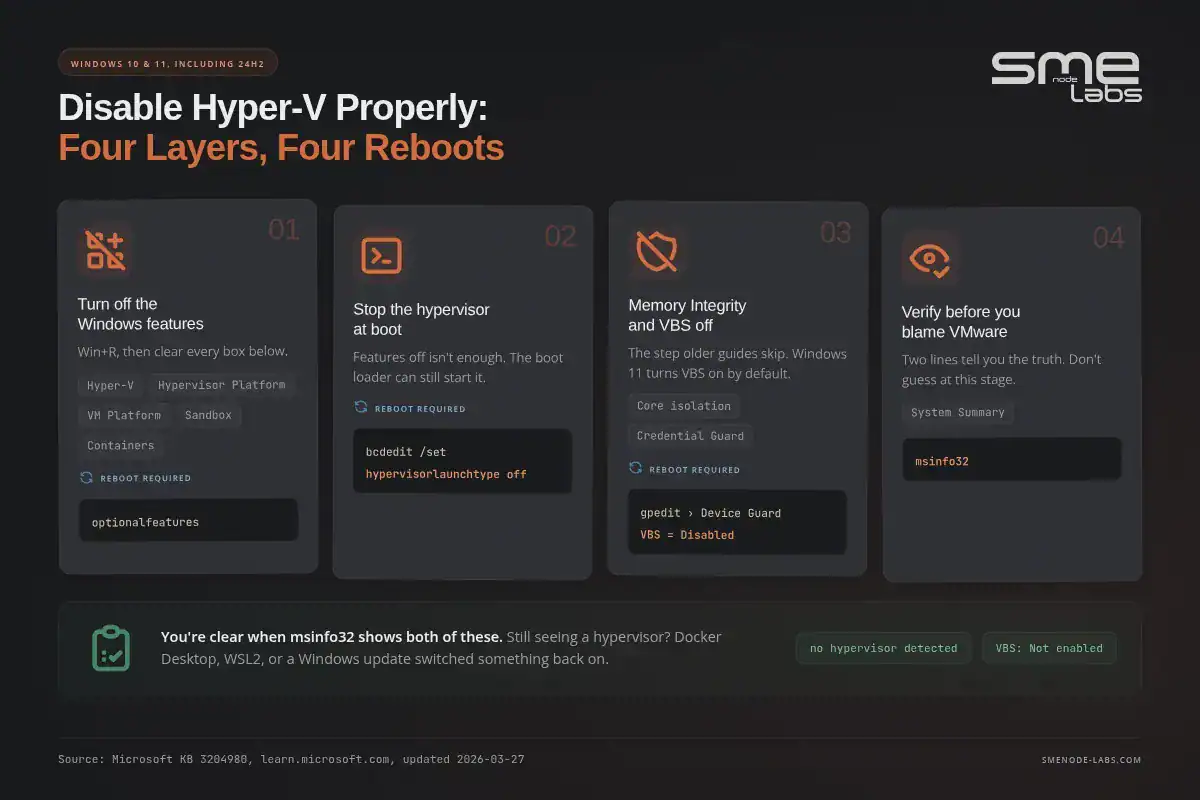
Step 1: Turn off the Windows features
Press Win+R, type optionalfeatures, press Enter. Uncheck every one of these that appears on your machine:
- Hyper-V (expand it and clear Hyper-V Platform, including Hyper-V Hypervisor)
- Windows Hypervisor Platform
- Virtual Machine Platform
- Windows Sandbox
- Containers
Click OK, then reboot. Yes, actually reboot. The change doesn’t apply until you do.
Prefer the command line? Run this in an admin PowerShell:
Disable-WindowsOptionalFeature -Online -FeatureName Microsoft-Hyper-V-Hypervisor
Disable-WindowsOptionalFeature -Online -FeatureName HypervisorPlatform
Disable-WindowsOptionalFeature -Online -FeatureName VirtualMachinePlatform
Or with DISM from an admin Command Prompt:
DISM /Online /Disable-Feature /FeatureName:Microsoft-Hyper-V-HypervisorStep 2: Stop the hypervisor from loading at boot
Turning off the feature isn’t always enough, because the boot loader can still start the hypervisor. One command settles it. Open Command Prompt as administrator:
bcdedit /set hypervisorlaunchtype offReboot again. To check what the setting currently is, run bcdedit with no arguments and look for hypervisorlaunchtype. You want off. To put it back later:
bcdedit /set hypervisorlaunchtype autoWrite that command down somewhere. You’ll want it the day you need Docker Desktop or WSL2 again.
Step 3: Turn off Memory Integrity and VBS (the Windows 11 step people miss)
This is the one that breaks older tutorials. Windows 11 ships Virtualisation-Based Security on by default, and VBS runs on the same hypervisor. Memory Integrity, also called HVCI, isolates kernel memory using that layer. With it on, VMware still can’t get clean access to VT-x/EPT.
Turn it off here:
Windows Security → Device security → Core isolation details → Memory integrity → Off, then reboot.
On managed or 24H2 machines the toggle sometimes greys out or flips itself back on. Two backstops:
- Group Policy:
gpedit.msc→ Computer Configuration → Administrative Templates → System → Device Guard → Turn On Virtualization Based Security → set to Disabled - Credential Guard: disable it too if your build has it on. Microsoft groups it with Memory Integrity as a Hyper-V dependent feature.
Step 4: Verify before you blame VMware
Don’t guess. Press Win+R, type msinfo32, press Enter. In System Summary, look for two lines:
| Line | What you want to see |
|---|---|
| “A hypervisor has been detected” | Gone. If it’s still there, something is still loading the hypervisor |
| Virtualization-based security | Not enabled |
If that line is still showing after all four steps, check Task Manager → Performance → CPU. “Virtualisation: Enabled” plus a live hypervisor means a feature crept back. Common culprits: a Windows update, Docker Desktop, WSL2, Android emulators, BlueStacks, and some anti-cheat game clients.
What if you can’t disable Hyper-V at all?
Windows 11 Home doesn’t list Hyper-V in Windows Features, which confuses people into thinking they’re safe. They’re not. Home still runs VBS and Memory Integrity, and Virtual Machine Platform still shows up if WSL2 is installed. The bcdedit command and the Core isolation toggle both work on Home, so use those.
Locked-down corporate laptop with Device Guard pushed by policy? You probably can’t win that fight. Two honest options: run EVE-NG on a spare box as a bare-metal install, or use a personal machine.
EVE-NG supports bare metal, VMware Workstation 16.0 or later, Player 16.0 or later, Fusion 8 or later, ESXi 6.7 or later, and Proxmox. Bare metal skips this whole problem, and nodes run faster because nothing is nested.
Not sure whether to stick with EVE-NG or switch tools? Our GNS3 vs EVE-NG comparison covers which one survives a weak laptop better.
Virtualization errors: VT-x, EPT, and nested labs
Hyper-V is off, hypervisor line is gone, and you still get an error. Now it’s about whether VT-x exists, is switched on, and is being handed down to EVE-NG.
Three checkpoints, top to bottom.
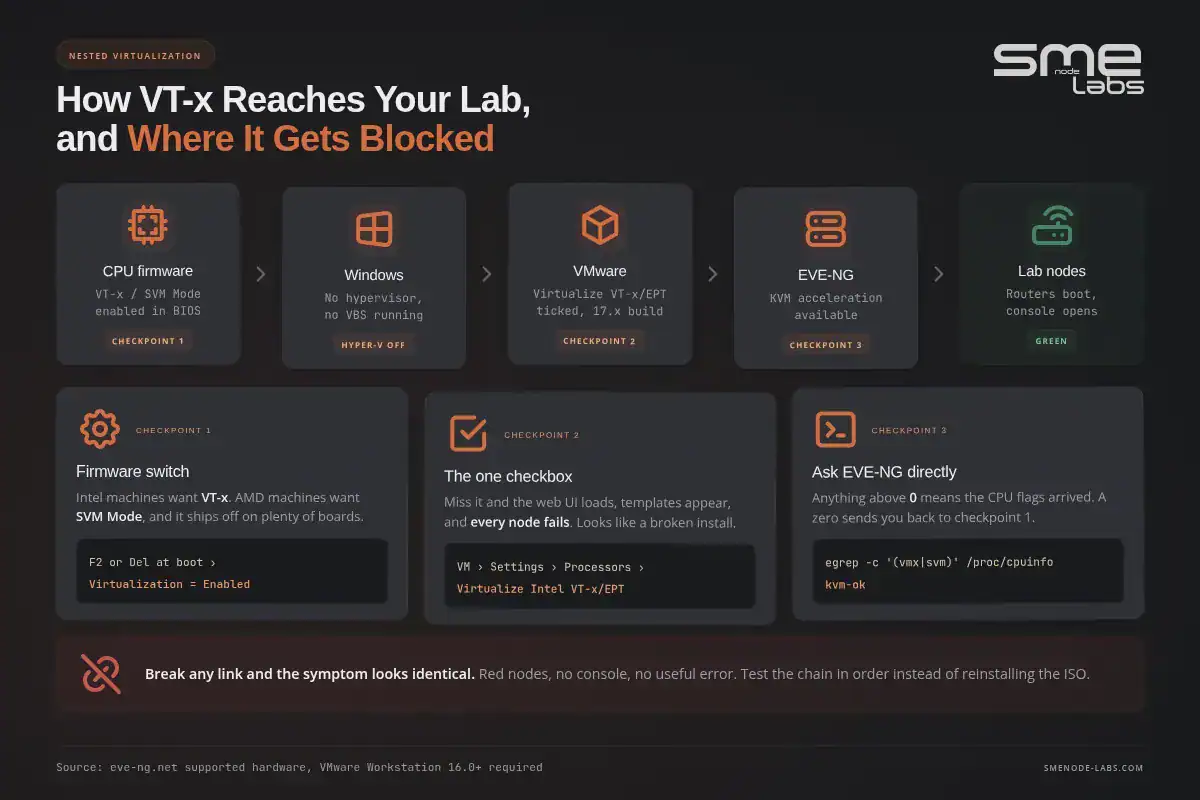
Checkpoint 1: BIOS or UEFI
Reboot into firmware setup (usually F2, F10, or Del at boot). Look for:
- Intel machines: Intel Virtualization Technology (VT-x) and VT-d
- AMD machines: SVM Mode or AMD-V
Set them to Enabled. Save and exit.
This one catches AMD builds. Every guide tells you to check “Virtualize Intel VT-x”, so the AMD section gets skipped and the CPU gets blamed for being too old. On a Ryzen desktop the setting is called SVM Mode, and it ships disabled from the factory. One toggle, one reboot, done. If you’re on AMD, EVE-NG notes that Ryzen 3900 class and newer EPYC chips behave properly with nested EPT, while some older AMD series cause trouble.
Checkpoint 2: The VMware checkbox
This one gets skipped constantly. Power off the EVE-NG VM, then:
VM → Settings → Processors → tick “Virtualize Intel VT-x/EPT” or “AMD-V/RVI”
Without that box ticked, your labs boot into a shell you can log into, the web UI loads, templates appear, and every single node fails. It looks like a broken install. It’s one checkbox.
While you’re in there, sanity-check the rest:
| Setting | Minimum for a small lab | Notes |
|---|---|---|
| Processors | 4 cores | Cores, not threads. 8 if you’re running IOS-XE or FortiGate nodes |
| RAM | 8 GB | 16 GB is where labs stop swapping |
| Disk | 80 GB | Thin provision is fine. Images eat space fast |
| Firmware | BIOS or UEFI to match your ISO | Mismatch shows up as a boot loop |
Checkpoint 3: Ask EVE-NG directly
SSH into the EVE-NG VM (default user root, password eve unless you changed it during setup) and run:
egrep -c '(vmx|svm)' /proc/cpuinfoAnything above 0 means the CPU flags made it through. A 0 means they didn’t, so go back to checkpoint 1 or 2. For a plainer answer, install the checker and run it:
apt install cpu-checker -y
kvm-ok
You want “KVM acceleration can be used”. If you get “KVM acceleration can NOT be used”, nothing inside EVE-NG will start properly, no matter how many times you reinstall. Reinstalling is the most common wasted afternoon in this whole process. The ISO is almost never the problem.
One more version note. EVE-NG asks for VMware Workstation 16.0 or later, and Workstation 17.x handles nested virtualization on current Windows builds far better than 15.x ever did. If you’re on an older build because of a licence, upgrade before you troubleshoot anything else.
Want the full install walked through instead of patched? Our step-by-step EVE-NG on VMware Workstation guide covers the whole build with the right settings from the start.
Permissions errors: the command everyone forgets
Your nodes still fail, but now the VM is healthy and KVM is available. This one’s easy, and it catches nearly everyone once.
When you copy device images into EVE-NG over SFTP, the files land with whatever ownership your transfer tool used. EVE-NG needs its own ownership and mode set on those files. One command fixes it:
/opt/unetlab/wrappers/unl_wrapper -a fixpermissionsRun it after every image upload. Every time. It’s the difference between “template appears, node dies” and a working lab.
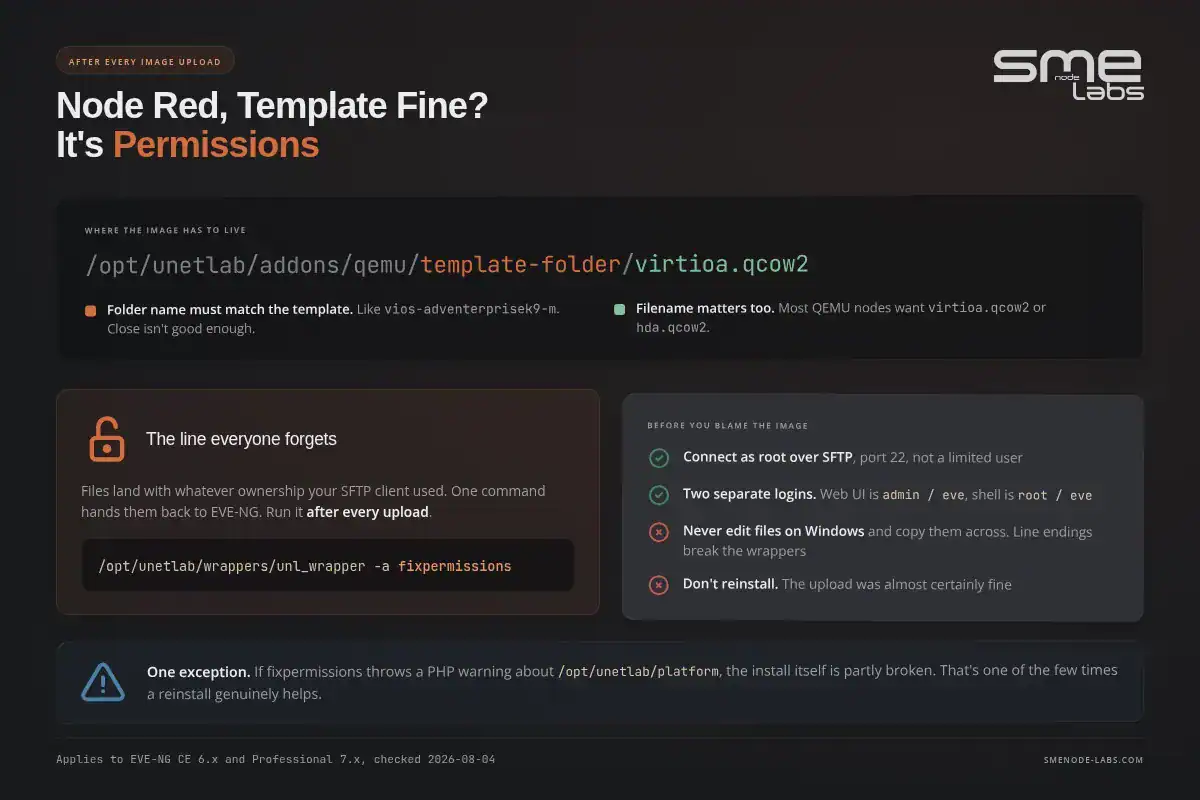
Here’s the permissions trap. You upload a FortiGate qcow2 through WinSCP, the template appears in the node list, so the upload looks fine. Then the node goes red on start, three times. Reinstalling EVE-NG from scratch and uploading again gives the same result, because the upload was never the problem. fixpermissions hasn’t been run. That’s an entire evening lost to one line of shell.
The permissions checklist
Work down this list before you touch anything else:
- Right folder. Images go under
/opt/unetlab/addons/qemu/<template-folder>/. The folder name has to match what the template expects, likevios-adventerprisek9-morfortinet-6.4.5. Close isn’t good enough - Right filename. Most QEMU nodes expect
virtioa.qcow2orhda.qcow2inside that folder. A file still namedimage-v6.4.5.qcow2won’t boot - Run fixpermissions. The command above
- Connect as root over SFTP on port 22, not as a limited user
- Never edit files on Windows and copy them across. Line endings get mangled, and the wrapper scripts fail with no useful message
If fixpermissions throws a PHP warning about /opt/unetlab/platform, your install is partly broken rather than mispermissioned. Reinstall is the honest answer there, and it’s one of the few times it actually helps.
Also worth knowing: the web UI login is separate from the shell login. Default web credentials are admin / eve. Default shell is root / eve. Change both before you put the box on a network anyone else can reach.
Errors that look like Hyper-V but aren’t
A few failures wear the same disguise. Rule these out so you stop chasing the hypervisor.
Not enough RAM. EVE-NG lets you build a topology it can’t actually run. Nine nodes at 2 GB each on an 8 GB VM will start a few, then fail the rest quietly. Check with free -h and count what your topology is asking for.
Version confusion, and it matters right now. EVE-NG Community Edition is marked End of Support and End of Life as of June 2026. The 6.2.0-4 ISO still downloads and still installs, and it won’t get further fixes.
Version 7 landed in mid-2026 on an Ubuntu 24.04 base, and it runs as Professional with a free tier of 7 nodes, unlimited VPCS, and admin-only access. So a 2023 tutorial against a v7 install won’t match on some paths and menus. Check your version before trusting any guide, including this one.
Console won’t open. That’s a client problem, not an install problem. The Windows client pack has to be installed on your host so telnet:// and vnc:// links hand off to PuTTY or your VNC viewer. Nodes are running fine, you just can’t see them.
Time and DNS drift. A VM whose clock is hours off will fail image pulls and throw odd errors on some appliances. timedatectl tells you fast.
The order to troubleshoot in
Do these in sequence. Don’t skip ahead, and reboot when told.
msinfo32→ is a hypervisor detected? Is VBS enabled?- Turn off Hyper-V, Windows Hypervisor Platform, Virtual Machine Platform, Windows Sandbox, Containers. Reboot
bcdedit /set hypervisorlaunchtype off. Reboot- Memory Integrity off, Credential Guard off. Reboot
msinfo32again. Both lines clean? Good- BIOS: VT-x or SVM Mode enabled
- VMware: tick Virtualize Intel VT-x/EPT, give it 4 cores and 8 GB
- In EVE-NG:
kvm-oksays acceleration can be used - Upload images to the correct folder with the correct filename
/opt/unetlab/wrappers/unl_wrapper -a fixpermissions- Start one small node. One. Then build the topology
Ten of those eleven steps take under a minute. The reboots are the slow part.
Frequently asked questions
Is disabling Hyper-V safe?
Yes, for a lab machine. You lose Hyper-V VMs, Windows Sandbox, WSL2, and Docker Desktop’s default backend while it’s off. You also lose Memory Integrity, which is a real security feature, so it’s a trade you should make deliberately. A dedicated lab box, or a laptop you can flip back with one command, is the sensible middle ground. The CCNA Lab Workbook ships the EVE-NG ISO plus graded lab scenarios, so you practise on a topology that’s already built.
What happens if Hyper-V is disabled?
Windows keeps working normally. Anything that depends on the Microsoft hypervisor stops: Hyper-V Manager VMs, WSL2, Windows Sandbox, Docker Desktop in WSL2 mode, and Memory Integrity. VMware Workstation, VirtualBox, and nested labs like EVE-NG get direct access to VT-x instead, which is the whole point.
Why can’t I disable Hyper-V on Windows 11?
Usually because something else is switching it back on. Check for Docker Desktop, WSL2, Virtual Machine Platform, Windows Sandbox, and Memory Integrity, then confirm with msinfo32. On corporate machines, Device Guard policy can override your local settings entirely, and only IT can lift that.
Do I need to disable Hyper-V if EVE-NG runs on bare metal?
No. Bare metal means EVE-NG owns the hardware, so there’s no Windows hypervisor to compete with, and no nesting penalty either. Nodes boot faster and you can run more of them. It’s the setup we’d pick for anyone studying past CCNP level.
Can I run EVE-NG on Hyper-V instead of disabling it?
Not properly. EVE-NG’s supported platform list covers bare metal, VMware Workstation, Player, Fusion, ESXi, and Proxmox. Hyper-V’s nested virtualization support doesn’t give the QEMU nodes inside EVE-NG what they need, so expect nodes that won’t start even when the VM itself boots.
How do I turn Hyper-V back on?
Run bcdedit /set hypervisorlaunchtype auto as administrator, re-check the Windows features you cleared, turn Memory Integrity back on in Windows Security, and reboot. Takes about five minutes including the restart.
Bottom line
Three causes, one order:
- Windows owns VT-x. Turn off the features, run
bcdedit /set hypervisorlaunchtype off, turn off Memory Integrity, and verify withmsinfo32 - VT-x isn’t reaching EVE-NG. Enable it in BIOS, tick Virtualize Intel VT-x/EPT in VMware, confirm with
kvm-ok - Permissions are wrong. Correct folder, correct filename, then
/opt/unetlab/wrappers/unl_wrapper -a fixpermissions
Reinstalling EVE-NG fixes almost none of this. Work the checklist instead and you’ll usually be running inside half an hour, most of it spent waiting on reboots.
Once it’s up, the harder question is what to actually build. Our CCNA Lab Workbook and CCNA Automation Workbook both ship with EVE-NG lab files and step-by-step tasks, so your lab time goes into configuring and breaking things instead of drawing topologies. Browse the full workbook catalogue for Fortinet, Azure, AWS, and MikroTik tracks.
New to the platform? Start with our EVE-NG install guide and come back here the moment something goes red.